Plant Propagation Guide
Multiply your favorite plants through cuttings, division, layering, and more. Learn vegetative propagation techniques that create exact clones of parent plants.
Why Vegetative Propagation?
Unlike growing from seeds, vegetative propagation creates genetic clones of the parent plant. This means you get the exact same variety with all its characteristics - flavor, color, disease resistance, and growth habit. It's also faster than starting from seed for many plants.
Exact Clones
Get identical plants with the same traits as the parent
Faster Results
Skip the seedling stage and get mature plants sooner
Free Plants
Multiply your garden without buying new plants
Propagation Methods
Different plants respond best to different propagation techniques. Choose the method that works best for your plant.
Root sections of stems to create new plants. Works for most herbs, many perennials, and woody plants.
Visual Guide:
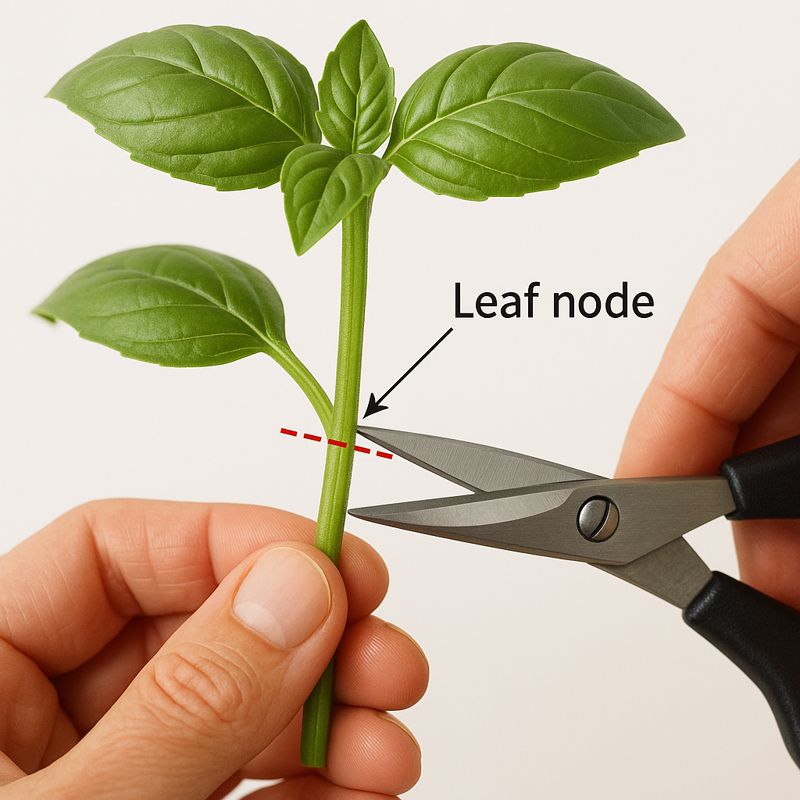
Cut just below a leaf node
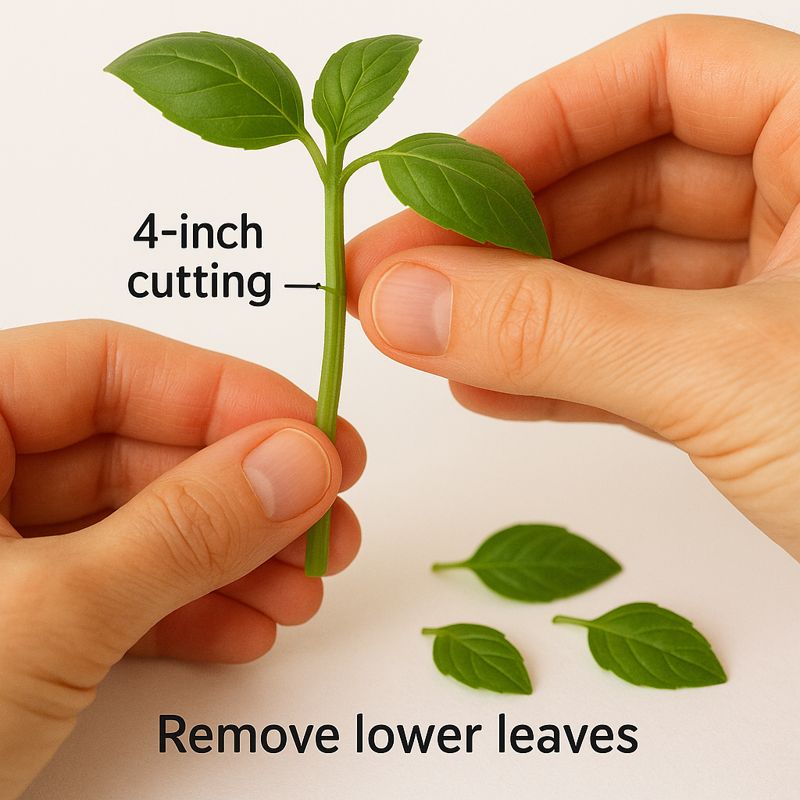
Remove lower leaves
Insert into rooting medium
Works Best For:
Step-by-Step:
- 1Select healthy, disease-free stems with no flowers
- 2Cut 4-6 inch sections just below a leaf node
- 3Remove lower leaves, keeping 2-3 sets at top
- 4Dip cut end in rooting hormone (optional but helpful)
- 5Insert into moist potting mix or water
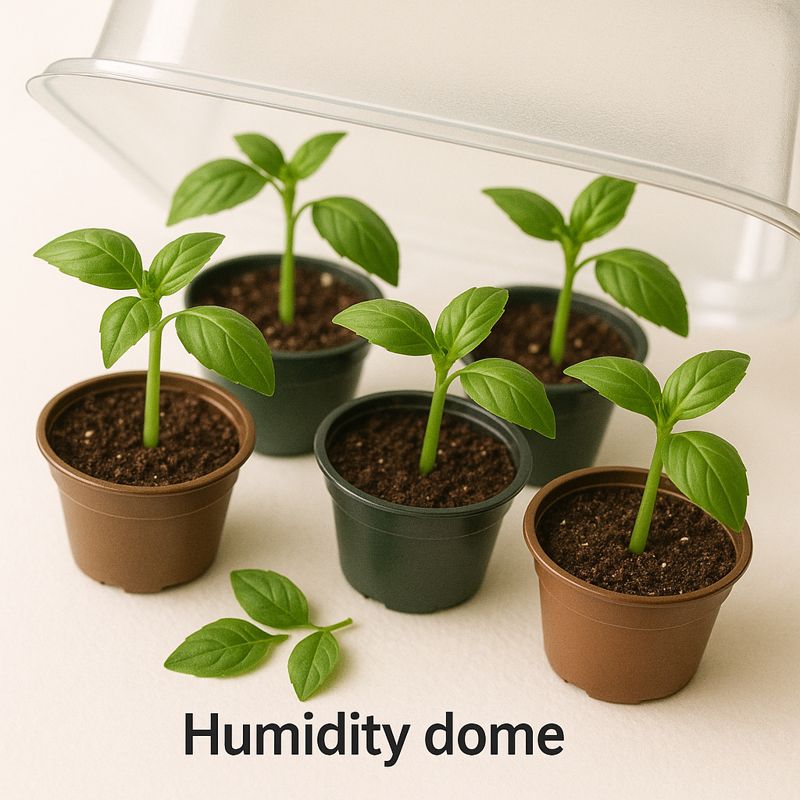
- 6Keep humid with plastic bag or dome
- 7Roots develop in 2-6 weeks depending on species
- 8Transplant when roots are 1-2 inches long
Pro Tips:
- Take cuttings in the morning when plants are hydrated
- Use clean, sharp scissors or pruners
- Change water every few days if rooting in water
- Softwood cuttings root faster than hardwood
Separate established clumps into multiple plants. The fastest way to multiply perennials.
Visual Guide:
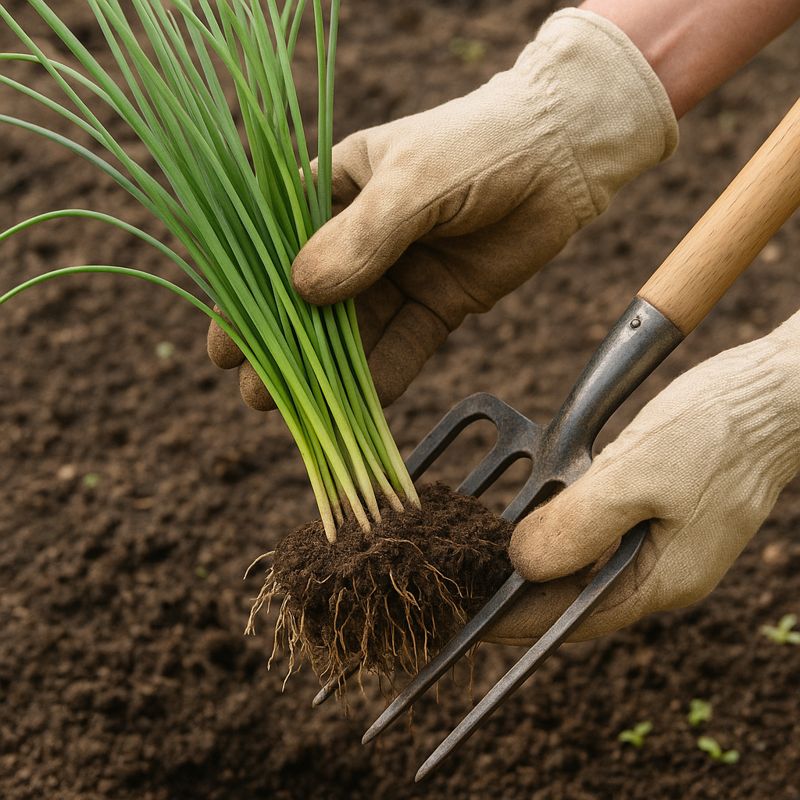
Dig up the entire clump
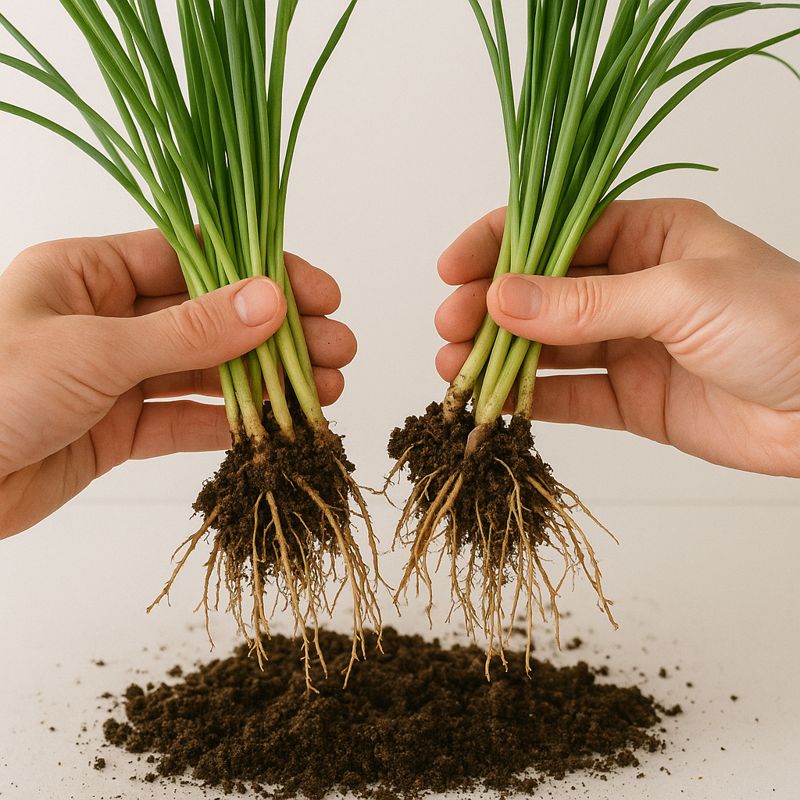
Separate into sections
Works Best For:
Step-by-Step:
- 1Water plant thoroughly the day before
- 2Dig up entire clump, keeping roots intact
- 3Shake or wash off excess soil to see root structure
- 4Pull apart or cut into sections with shoots and roots
- 5Each division needs at least 3-5 shoots
- 6Replant immediately at same depth
- 7Water deeply and mulch
- 8Keep moist for first few weeks
Pro Tips:
- Divide plants every 3-4 years to maintain vigor
- Use a sharp spade or knife for tough roots
- Discard old, woody center portions
- Larger divisions establish faster
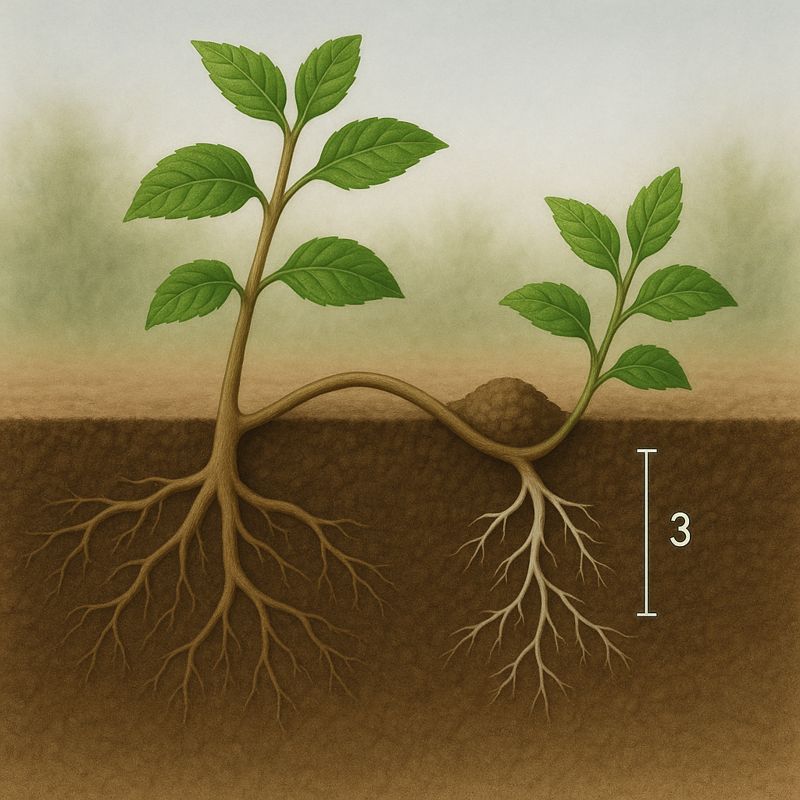
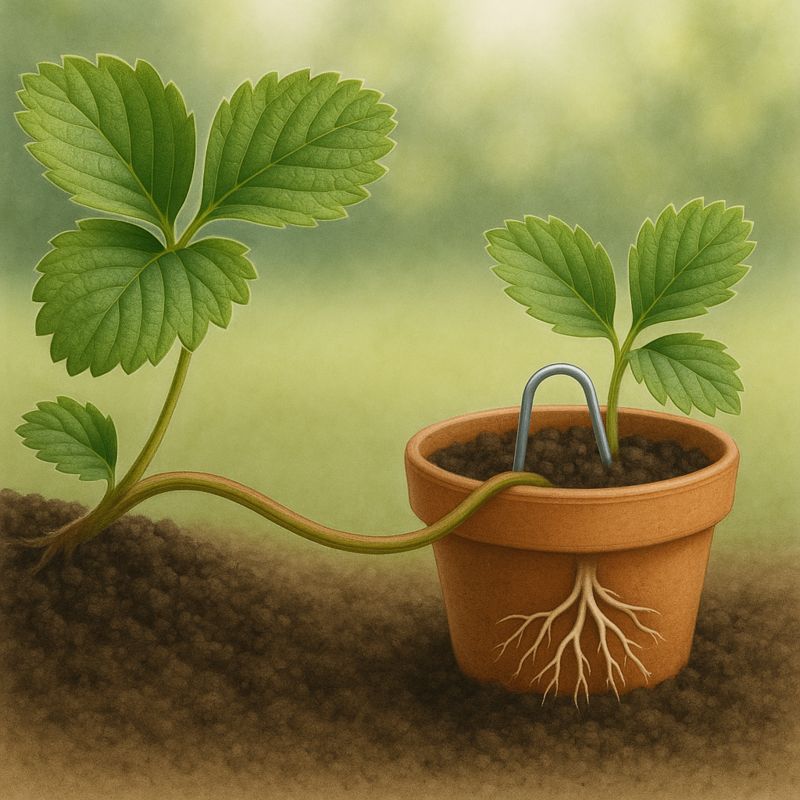
Root stems while still attached to the parent plant. Low-risk method with high success.
Visual Guide:
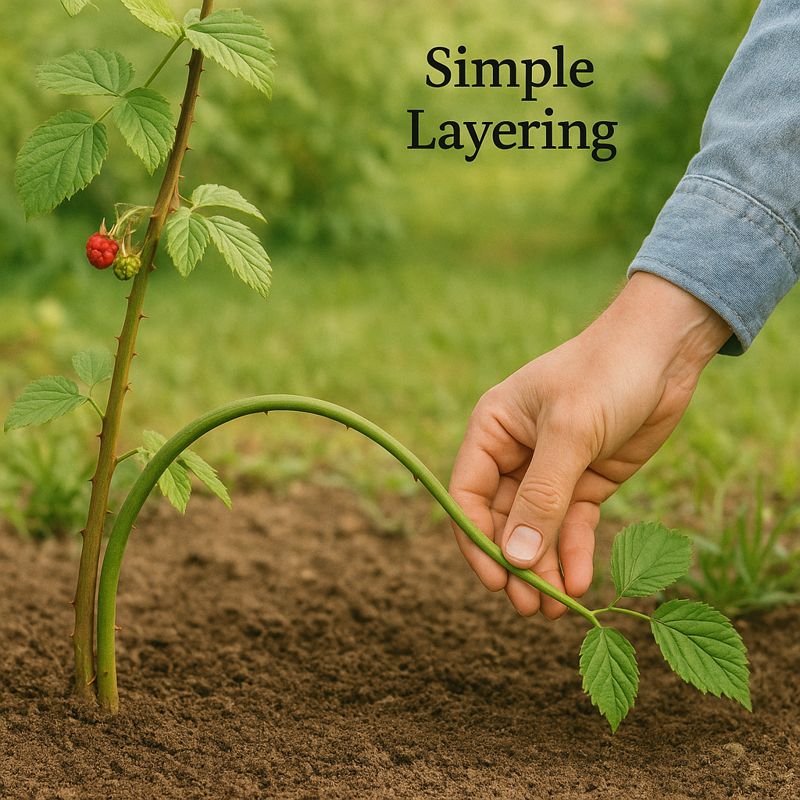
Bend stem to touch ground
Bury stem, expose tip
Works Best For:
Step-by-Step:
- 1Select a flexible, low-growing stem
- 2Bend stem to ground and mark contact point
- 3Wound the stem slightly where it touches soil
- 4Bury 3-4 inches of stem, leaving tip exposed
- 5Pin down with wire staple or rock
- 6Keep soil moist throughout rooting period
- 7Check for roots after 4-8 weeks
- 8Sever from parent and transplant when well-rooted
Pro Tips:
- Wounding the stem encourages root formation
- Tip layering works well for brambles
- Air layering works for plants that can't bend to ground
- Leave connected to parent as long as possible
Separate baby plants that form naturally on stolons or at the base of parent plants.
Visual Guide:
Pin runner to pot
Works Best For:
Step-by-Step:
- 1Wait until runners/offsets develop visible roots
- 2For strawberries, pin runner to soil in small pot
- 3Allow roots to establish (2-4 weeks)
- 4Cut connection to parent plant
- 5For offsets, gently separate from parent
- 6Pot up or transplant to final location
- 7Water well and protect from intense sun
- 8Treat as mature plant once established
Pro Tips:
- Strawberry runners are most vigorous in first year
- Remove excess runners to strengthen parent
- Offsets grow faster with some parent root attached
- Best success when offset is 1/3 size of parent
Grow new plants from root sections. Best for plants with thick, fleshy roots.
Works Best For:
Step-by-Step:
- 1Dig up plant or expose roots on one side
- 2Select pencil-thick roots for best results
- 3Cut 2-4 inch sections, noting top/bottom orientation
- 4Cut top flat and bottom at angle to track orientation
- 5Plant vertically with flat top just below soil surface
- 6Keep moist but not waterlogged
- 7Shoots emerge in 4-8 weeks
- 8Transplant when well-rooted with several leaves
Pro Tips:
- Thicker roots produce stronger plants
- Orientation matters - plant right side up
- Store cuttings in moist sand if not planting immediately
- Some plants are aggressive and spread from any root piece
Essential Equipment
Basic propagation doesn't require much. Here's what you'll need to get started:
Ideal Conditions for Rooting
65-75°F (18-24°C) is ideal for most cuttings. Bottom heat from a heat mat can speed rooting by 50% for difficult species.
High humidity (80-100%) prevents cuttings from drying out before roots form. Use a dome, plastic bag, or mist regularly.
Bright, indirect light is best. Direct sun can overheat cuttings and cause wilting. A north window or under grow lights works well.
Method Comparison
| Method | Difficulty | Success Rate | Time to Root |
|---|---|---|---|
| Stem Cuttings | easy | 70-95% | 2-6 weeks |
| Division | easy | 90-100% | Immediate |
| Layering | moderate | 80-95% | 4-8 weeks |
| Runners | easy | 95-100% | 2-4 weeks |
| Root Cuttings | moderate | 60-80% | 4-8 weeks |